티스토리 블로그 글을 작성할 때 자동 목차(TOC)를 추가하는 방법을 단계별로 소개합니다. 간단한 HTML, CSS 수정으로 자동 목차를 쉽게 추가하세요.


티스토리 블로그 자동 목차 넣기 (TOC)

티스토리 블로그 글을 작성할 때 자동 목차(TOC)를 추가하는 예제입니다.
❗️ 이글은 티스토리 북클럽스킨을 대상으로 만든 예제입니다.
1. HTML 수정
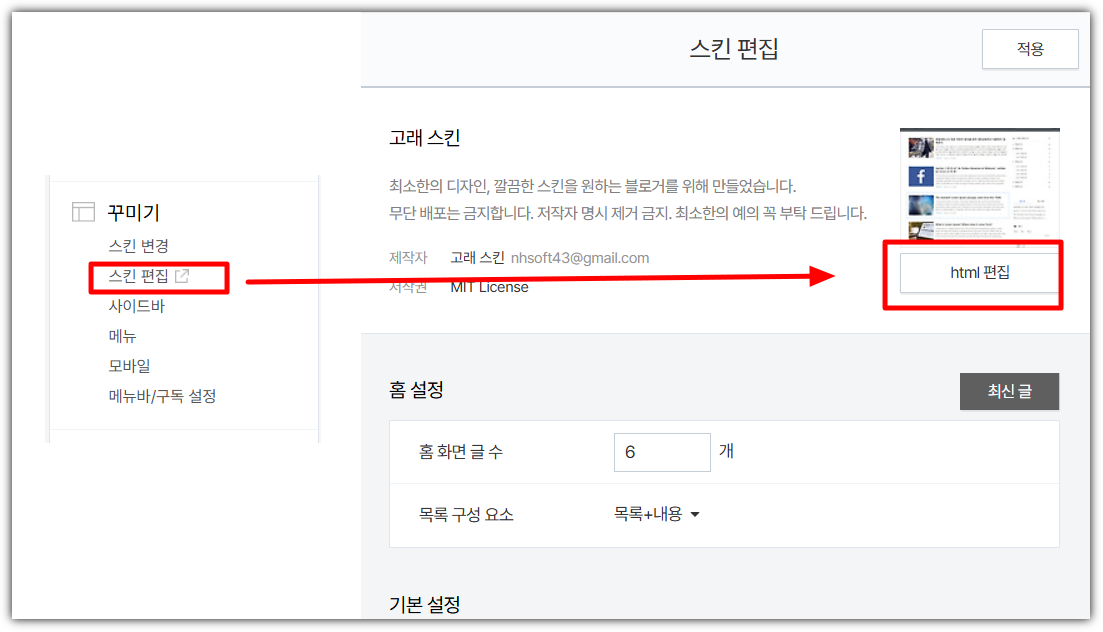
티스토리 관리페이지 → 꾸미기 → 스킨편집 → HTML 편집 → HTML
HTML에서 </head> 앞에 아래 코드를 추가합니다:
<script src="https://cdnjs.cloudflare.com/ajax/libs/tocbot/4.11.1/tocbot.min.js"></script>
<link rel="stylesheet" href="https://cdnjs.cloudflare.com/ajax/libs/tocbot/4.11.1/tocbot.css">
HTML에서 </body> 앞에 아래 코드를 추가합니다:
<script type="text/javascript">
$(document).ready(function () {
    if (!location.pathname.startsWith("/entry/")) {
        return
    }
    var content = document.querySelector(".entry-content");
    var headings = [...content.querySelectorAll("h1, h2, h3, h4, h5, h6, h7")].filter(e => !e.parentElement.classList.contains('another_category'));
    if (headings.length <= 1) {
        return
    }
    let tocHead = document.createElement('div');
    tocHead.className = 'toc-head';
    content.prepend(tocHead);
    var headingMap = {};
    headings.forEach(function (heading) {
        var id = heading.id ? heading.id : heading.textContent.trim().toLowerCase().split(" ").join("-").replace(/[\!\@\#\$\%\^\&\*\(\):]/gi, "");
        headingMap[id] = !isNaN(headingMap[id]) ? ++headingMap[id] : 0;
        if (headingMap[id]) {
            heading.id = id + "-" + headingMap[id];
        } else {
            heading.id = id;
        }
    });
    tocbot.init({
        tocSelector: ".toc-head",
        contentSelector: ".entry-content",
        headingSelector: "h1, h2, h3",
        hasInnerContainers: false,
        activeLinkClass: 'toc-head-active-link',
        disableTocScrollSync: false,
        collapseDepth: 3,
        ignoreSelector: '.another_category h4',
    });
});
</script>
2. CSS 수정
티스토리 관리페이지 → 꾸미기 → 스킨편집 → HTML 편집 → CSS

CSS에서 아래 코드를 추가합니다:
/* TOC */
.toc-absolute {
    position: absolute;
    margin-top: 10px;
}
.toc-fixed {
    position: fixed;
    top: 30px;
}
.toc-none {
    display: none;
}
.toc {
    right: calc((100% - 915px) / 2 - 170px);
    width: 330px;
    padding: 10px;
    box-sizing: border-box;
}
.entry-content.toc-head {
    background-color: #fafafa;
    opacity: 0.8;
}
.toc-head {
    font-size: 1em;
    font-weight: 500;
    margin-bottom: 40px;
    padding-bottom: 10px;
    padding-top: 10px;
    border: 1px solid #999;
}
.toc-head:before {
    content: "목 차";
    display: block;
    text-align: center;
    padding: 4px 10px;
    margin: 0 auto 0;
}
.is-active-link::before {
    background-color: #0000ff !important;
}
.toc-head > ol {
    list-style: none;
}
.toc-head > ol > li > ol {
    list-style: none;
    margin: 10px 0;
}
.toc-head ol > li {
    margin: 10px 0;
    text-indent: 0px;
}
.toc-head > ol > li {
    color: black;
}
.toc-head a:before {
    background-color: #fff0;
}
.toc-head-active-link {
    font-weight: 500;
}
.toc-list > li {
    margin-top: 10px !important;
    font-size: 0.9em;
}
.toc > .toc-list li {
    margin-bottom: 10px;
}
.toc > .toc-list li:last-child {
    margin-bottom: 0;
}
.toc > .toc-list li a {
    text-decoration: none;
}
.toc-title {
    font-weight: 500;
    font-size: 1.2em;
    color: dimgray;
    padding: 10px;
    background-color: #f1f1f1;
    text-align: center;
}
@media screen and (max-width: 950px) {
    .toc {
        display: none;
    }
}
3. 마무리
블로그 글을 작성하면 아래와 같이 자동으로 목차를 생성해줍니다.
- HTML 수정
- CSS 수정
- 마무리
